Sunday, May 31, 2009

How to add the bias trim

Okay, I have made my yards and yard of bias trim. Now is the fun part adding the bias trim to my projects.


I am making 3 circle skirts with bias trim about 2 inches from the bottom and 3 pairs of pants with bias trim down the side seams.


Years ago I would have used a lot of pins to get the bias trim in the right place. Straight Pins will work but not as easy.

Today I use water soluble glue to tack it into place. You could also use a water soluble glue stick that your kids use(not the purple type).

This is what I love to use mainly because of the applicator top(NAYY).

This applicator top is also perfect for applying just a drop of glue in tiny places. For example turning the ends under on a bias neck binding on a bishop dress. Here's how I use it......

  • Mark the bottom of the skirt with a wash a way marker. I am drawing the center line of where I want to place my bias strip. On the pants I just followed the side seam line.


  • Add Basting glue in small segments to the line I marked. Then carefully lay the bias strip down the middle of the glue line. After I have it exacly where I want it, I press the section of bias strip to dry the glue.

I left a 3 inch section at the start and stop of the bias trim unglued so I could join the two pieces with a mitered seam.

Then I top stitched along both edges with an edge foot.

Thursday, May 28, 2009

bias tape maker

I am working on a project that has a lot of bias trim.


I have several bias tape makers in several sizes and I don't really care for any of them. I am forever burning my fingers or the bias strip wants to twist an turn.

Here is what I came up with instead.........

Decide what width your finish bias tape needs to be. (for me it was 1/2 inch)


  • Cut your bias strips twice the finished width. (my bias stripes were cut 1 inch wide)

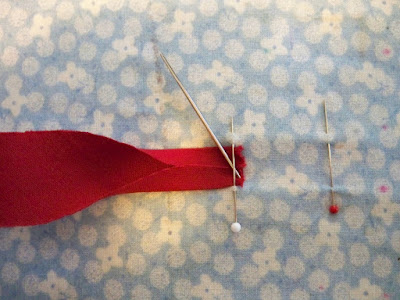
  • On your ironing board(I found out that a lace shaping/blocking board was too stiff) place a straight pin as illustrated. Place another straight pin about an inch apart. The center part of the straight pins is just slightly wider then 1/2 inch.


  • Take your bias strip and finger press one end in half to find the center. Fold the two edges in toward the center crease line. With the help of a pin or needle, ease the bias strip under the first pin.

  • Without stretching the bias strip, guide the folded strip under the second pin. Press. (if the bias strip does not go under the two pins easy or the two folded end overlap, you may have the straight pin center area slightly larger.)

  • Guide another section under the straight pins and press.


With this method of making bias tape you can make your bias tape whatever width you need without having to buy another gadget.


My sister

My sister and I are the same height.


I repeat, my sister and I are EXACTLY the same height!


But in every photo that is taken you see this.........


Here is another photo taken at the same time


Because in every photo at the last minute my sister does this....She gets on her tiptoes!


Just want to set history straight. ~janet

Tuesday, May 26, 2009

Good Morning, Welcome to my blog. This is suppose to be about Smocking about Heirloom Sewing but I may drift off topic occasionally.