I have several bias tape makers in several sizes and I don't really care for any of them. I am forever burning my fingers or the bias strip wants to twist an turn.
Here is what I came up with instead.........
Decide what width your finish bias tape needs to be. (for me it was 1/2 inch)
- Cut your bias strips twice the finished width. (my bias stripes were cut 1 inch wide)
- On your ironing board(I found out that a lace shaping/blocking board was too stiff) place a straight pin as illustrated. Place another straight pin about an inch apart. The center part of the straight pins is just slightly wider then 1/2 inch.

- Take your bias strip and finger press one end in half to find the center. Fold the two edges in toward the center crease line. With the help of a pin or needle, ease the bias strip under the first pin.
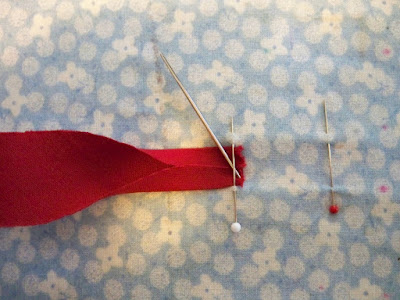
- Without stretching the bias strip, guide the folded strip under the second pin. Press. (if the bias strip does not go under the two pins easy or the two folded end overlap, you may have the straight pin center area slightly larger.)

- Guide another section under the straight pins and press.

With this method of making bias tape you can make your bias tape whatever width you need without having to buy another gadget.
Love this idea, Janet. I too have never been happy with those bias gizmos. Can't wait to try this.
ReplyDeleteCissie
Cissie, let me know if you have any questions or problems when you try it. I have used this method for several years now. I don't think I would ever go back to using a store bought bias tape maker again.~janet g
ReplyDeleteola, estou sempre por aqui.
ReplyDeletebjosss...
So cool idea! And looks so much easier than the bias tools... I certainly will try it!
ReplyDeleteThank you,
Luciana.
ótima ideia parabens
ReplyDelete