Saturday, June 6, 2009

Old Photos


I love old old photographs. This is a photo of my Great Grandmother's Sunday school class. The photo is around the early 1900's. It was taken in Ft Worth, Texas.

But my grandmother is not in the photo because she was pregnant.

I have spent hours with a magnifying glass looking at this photo.

I am assuming the man in the photo was the preacher. And the lady next to him, who is leaning away from him is not his wife (or maybe she is?).


Half the women are looking one way and the others are looking another. The only thing I can think of was they are looking at their children misbehaving!

But I still have questions.
Why is one lady looking at her shoes or is she asleep?
Why is the little boy in the photo and boy does the women behind him look mad.
Is the women in black in mourning?
One lady in the end with the black purse sure looks mean!
Why does the lady in front have her umprella with her? Was it going to rain?

Friday, June 5, 2009

Angels Watching Over Me

I am usually working on a several projects at any given time.


Besides the repairing the Vintage Christening gown I am working on a "coming home" baby dress for a friend's grand baby.


I am smocking it with my smocking design "Angels Watching over Me" which is in Sew Beautiful #121 http://www.sewbeautifulmag.com/issues/issues2008.html


Here is a picture of the size 3 month dress that was in Sew Beautiful . This was a work in progress photo with pleating thread attached and the bias binding not done.

The baby is not due till the end of the month but the mom is on bed rest. I have the borders done on the newborn bishop, I will start smocking the angels as long as I can. She may end up with only one angel or maybe seven.

Wednesday, June 3, 2009

Vintage Christening Gown

I have been trying to finish up some project but I have had a major distraction in my sewing room.


I was over at friend's house working on VBS craft projects. Later she gave me a tour her house. In her bedroom, sitting on a chair, was an antique doll wearing this christening gown. The doll and the dress had been in an antique cradle but she had moved it after the cats decided to sleep on the dress. OMG!


I very nicely volunteered to clean the dress....Ok, I was probably a little pushy but she agreed when she saw me doing the happy dance in her bedroom.


I soaked the dress in a Biz Bucket for 2 days. I changed the solution about every 8 hours(the water was brown).


I am making a guesstimate of 1880 or earlier as the date of the dress because it has a scooped neck and drawstrings at the neck and waist. Anyone else have any ideas?


There is some damage to the dress from age (not the cats). I am in the process of stabilizing the areas that are damaged.


Monday, June 1, 2009

More Smocking Designs

In my spare time between living on a farm, raising a 9 year old, waiting for my two adult sons to make me a grandmother, being a Girl Scout Leader, and being married to an old Fighter Pilot, I am a Designer for Sew Beautiful Magazine.

Here are links to two more of my smocking designs, "Play Ball" and "Two Points".

http://www.sewbeautifulmag.com/article/issue114.html

http://www.sewbeautifulmag.com/article/pdf-files/120-graph.pdf


There is also an article on how to add a smocked insert into a sweat shirt.

http://www.sewbeautifulmag.com/article/issue120.html


Enjoy!

Sunday, May 31, 2009

How to add the bias trim

Okay, I have made my yards and yard of bias trim. Now is the fun part adding the bias trim to my projects.


I am making 3 circle skirts with bias trim about 2 inches from the bottom and 3 pairs of pants with bias trim down the side seams.


Years ago I would have used a lot of pins to get the bias trim in the right place. Straight Pins will work but not as easy.

Today I use water soluble glue to tack it into place. You could also use a water soluble glue stick that your kids use(not the purple type).

This is what I love to use mainly because of the applicator top(NAYY).

This applicator top is also perfect for applying just a drop of glue in tiny places. For example turning the ends under on a bias neck binding on a bishop dress. Here's how I use it......

  • Mark the bottom of the skirt with a wash a way marker. I am drawing the center line of where I want to place my bias strip. On the pants I just followed the side seam line.


  • Add Basting glue in small segments to the line I marked. Then carefully lay the bias strip down the middle of the glue line. After I have it exacly where I want it, I press the section of bias strip to dry the glue.

I left a 3 inch section at the start and stop of the bias trim unglued so I could join the two pieces with a mitered seam.

Then I top stitched along both edges with an edge foot.

Thursday, May 28, 2009

bias tape maker

I am working on a project that has a lot of bias trim.


I have several bias tape makers in several sizes and I don't really care for any of them. I am forever burning my fingers or the bias strip wants to twist an turn.

Here is what I came up with instead.........

Decide what width your finish bias tape needs to be. (for me it was 1/2 inch)


  • Cut your bias strips twice the finished width. (my bias stripes were cut 1 inch wide)

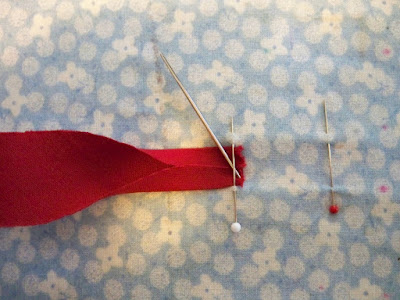
  • On your ironing board(I found out that a lace shaping/blocking board was too stiff) place a straight pin as illustrated. Place another straight pin about an inch apart. The center part of the straight pins is just slightly wider then 1/2 inch.


  • Take your bias strip and finger press one end in half to find the center. Fold the two edges in toward the center crease line. With the help of a pin or needle, ease the bias strip under the first pin.

  • Without stretching the bias strip, guide the folded strip under the second pin. Press. (if the bias strip does not go under the two pins easy or the two folded end overlap, you may have the straight pin center area slightly larger.)

  • Guide another section under the straight pins and press.


With this method of making bias tape you can make your bias tape whatever width you need without having to buy another gadget.


My sister

My sister and I are the same height.


I repeat, my sister and I are EXACTLY the same height!


But in every photo that is taken you see this.........


Here is another photo taken at the same time


Because in every photo at the last minute my sister does this....She gets on her tiptoes!


Just want to set history straight. ~janet